
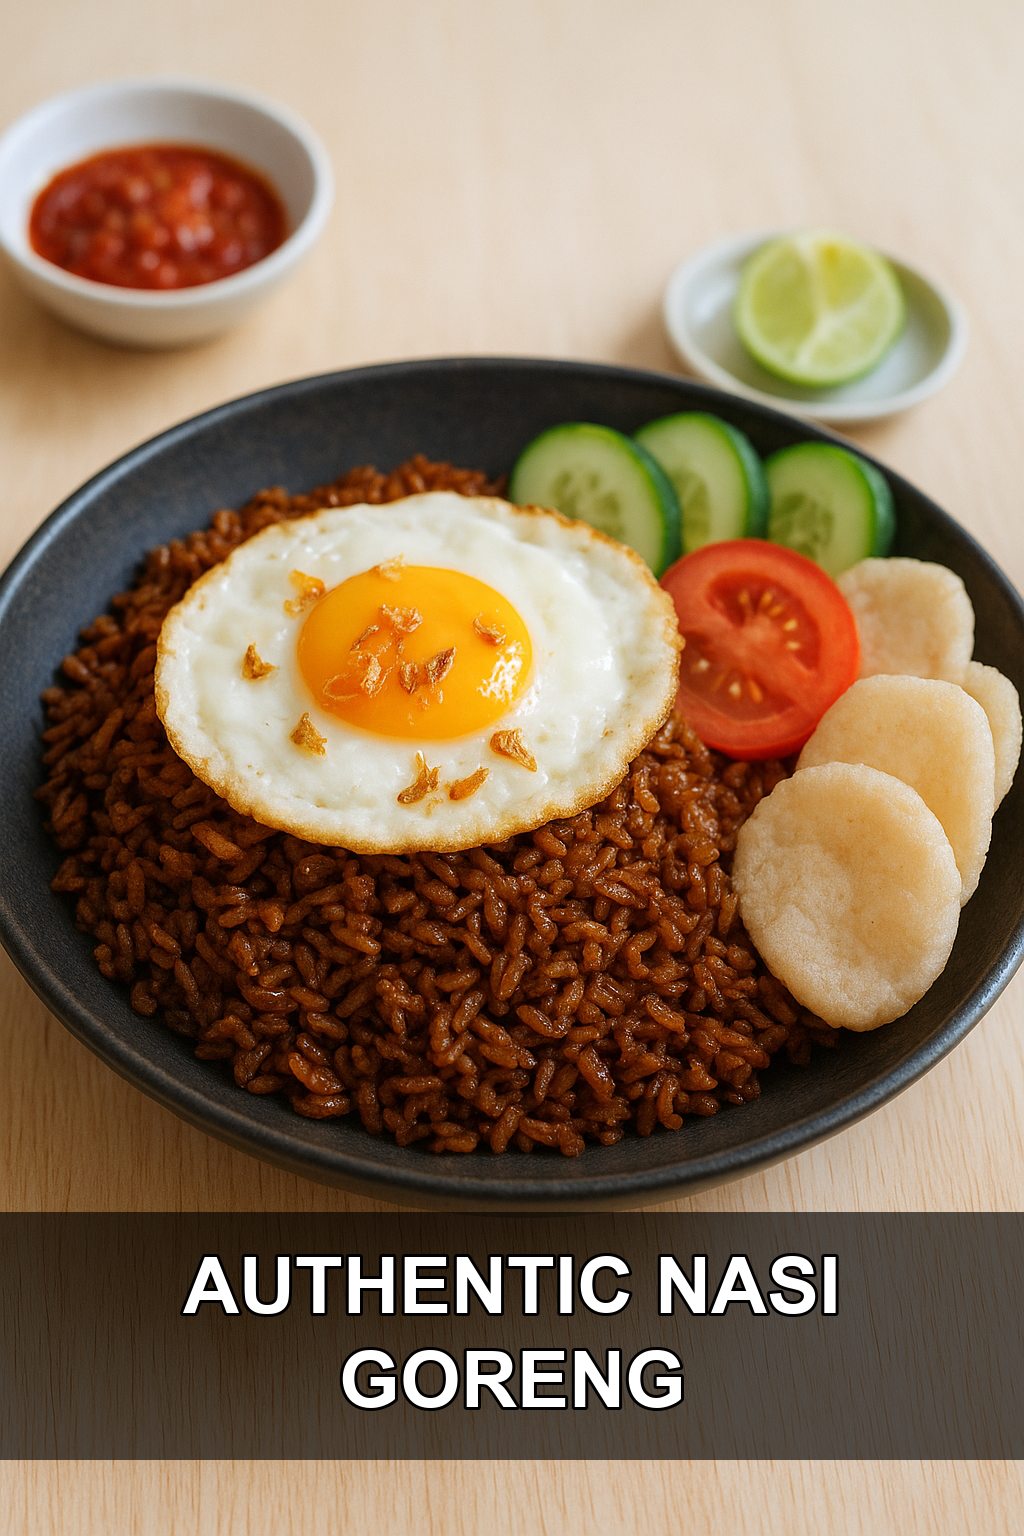
- What Is Nasi Goreng?
- Tips for Cooking and Prepping
- Recipe Variations and Substitutes
- Serving Suggestions
- Storing, Make-Ahead, and Freezing Tips
- FAQs
- Authentic Nasi Goreng Recipe
If you’ve only ever had the ketchup-fried-rice version of nasi goreng, you’re in for a serious upgrade. This is the real deal: a punchy, smoky, deeply savoury Indonesian fried rice built on a fresh chilli-shallot paste and finished with a crispy fried egg on top. Give me 30 minutes tonight and I’ll show you exactly how to get that restaurant-style char at home.
What Is Nasi Goreng?
Nasi goreng simply means “fried rice” in Indonesian and Malay, but calling it just fried rice undersells it enormously. Unlike the soy-and-sesame style fried rice found in Chinese cooking, authentic nasi goreng gets its signature flavour from a blended bumbu paste of shallots, garlic, and chillies, deepened with terasi (fermented shrimp paste) and sweetened with dark, syrupy kecap manis.
It’s considered Indonesia’s unofficial national dish and is eaten everywhere from street food carts to home kitchens, almost always topped with a sunny-side-up fried egg, a scattering of crispy shallots, and cool sliced cucumber and tomato on the side. The combination of smoky charred rice, sweet-savoury sauce, and a runny egg yolk stirred through at the table is what makes it so addictive.
Tips for Cooking and Prepping
#1: Use cold, day-old rice
Fresh warm rice is too soft and steamy and will turn to mush in the wok. Cold rice that’s been refrigerated for 8-24 hours has firmer, drier grains that fry up separate and slightly chewy.
#2: Separate every grain by hand
Before the rice touches the wok, break up all the clumps with your fingers. If clumps go in cold, they’ll stay clumped even once hot, and you’ll end up with mushy pockets instead of individual fried grains.
#3: Don’t skip blooming the terasi
Shrimp paste smells sharp and pungent raw, but frying it in hot oil for 45 seconds transforms it into a deep, savoury backbone for the whole dish. This step is what separates authentic nasi goreng from a bland imitation.
#4: Get real heat and let the rice sit
Preheat your wok until it’s nearly smoking before adding oil, then press the rice firmly against the surface and leave it undisturbed for 20-30 seconds at a time. That contact time is what creates the smoky, slightly charred flavour called wok hei.
#5: Taste before you finish
Kecap manis brands vary a lot in sweetness and thickness, so start with 2 tablespoons, taste, and add more along with salt as needed before you pull the pan off the heat.
Recipe Variations and Substitutes
Nasi goreng is endlessly adaptable to whatever protein or spice level you like. Swap in chicken thigh, prawns, or cubed tofu depending on what you have, and adjust the chilli count and type (bird’s eye for fiery, large red chilli for mild) to suit your heat tolerance. Vegetarians can skip the terasi and use a splash of soy sauce or a vegetarian shrimp paste substitute, and for extra bulk, toss in some shredded cabbage or leftover roasted vegetables in the final minute of frying.
Serving Suggestions
Serve nasi goreng piping hot, straight from the wok, topped with a just-fried egg so the yolk breaks over the rice as you eat. Round out the plate with crunchy prawn crackers on the side (never on top, they go soggy fast), fresh cucumber and tomato slices for a cooling contrast, and sambal oelek plus lime wedges at the table so everyone can adjust their own heat and acidity.
Storing, Make-Ahead, and Freezing Tips
Nasi goreng is best fresh, but leftovers keep in an airtight container in the fridge for up to 3 days. Reheat in a hot pan or wok with a splash of water to loosen the grains rather than in the microwave, which can make it gummy. The bumbu paste can also be made a day or two ahead and stored covered in the fridge, which actually saves time on a busy weeknight.
FAQs
Why is my nasi goreng mushy instead of fried?
This almost always comes down to using freshly cooked, warm rice instead of cold, day-old rice. Warm rice holds too much moisture and steams rather than fries, so refrigerate your rice for at least 8 hours before cooking.
Can I make nasi goreng without shrimp paste (terasi)?
Yes, though it will taste noticeably milder and less complex. You can leave it out entirely or replace it with a small splash of fish sauce or a vegetarian shrimp paste alternative for a similar savoury depth.
What can I use instead of kecap manis?
If you can’t find kecap manis, mix regular soy sauce with a bit of brown sugar or molasses in roughly equal parts until it reaches a similar thick, sweet consistency. It won’t be identical, but it gets you close.
What’s the difference between nasi goreng and regular fried rice?
The key difference is the blended bumbu paste of shallots, garlic, and chilli plus fermented shrimp paste, which gives nasi goreng a much deeper, spicier, more complex flavour than simple soy-sauce-seasoned fried rice.
Do I really need a wok to make this?
A carbon steel wok helps because it gets extremely hot and holds heat well, which is key for that slightly charred flavour, but a large heavy skillet over the highest heat your stove allows will still give great results.
Authentic Nasi Goreng Recipe
Prep time: 15 min | Cook time: 15 min | Total time: 30 min | Servings: 2
Ingredients
For the Bumbu Paste
- 4 shallots, peeled and roughly chopped
- 4 garlic cloves
- 2 red chillies (bird’s eye for hot, large red chilli for mild), adjust to taste
- 1 tsp terasi (fermented shrimp paste)
For the Fried Rice
- 300g (2 cups) cooked jasmine rice, refrigerated 8-24 hours
- 2 tbsp neutral oil (or shallot frying oil if making crispy shallots)
- 2 eggs
- 100g (3.5oz) protein: chicken thigh, prawns, or tofu, cut small
- 2 spring onions (scallions), sliced into 2cm pieces
- 2-3 tbsp kecap manis, start with 2, add more to taste
- 1 tbsp regular soy sauce
- 1 tsp sesame oil, added off heat at the end
- Salt, to taste
For Serving
- 2 eggs, fried sunny side up, one per serving
- 2 tbsp crispy fried shallots, store-bought or homemade
- Sliced cucumber and tomato
- Prawn crackers (krupuk), served alongside, not on top
- Sambal oelek or chilli sauce, at the table
- Lime wedges
Instructions
- Make the bumbu paste: Blend the shallots, garlic, and chillies to a coarse paste using a food processor, blender, or mortar and pestle. It doesn’t need to be completely smooth, some texture is fine. Set aside.
- Separate the cold rice: Break the cold rice apart with your fingers into individual grains before it goes near the wok. Cold refrigerated rice clumps, and if it goes into the wok in clumps it will not separate once hot and partially cooked. Take 2-3 minutes to separate every grain by hand now.
- Preheat the wok: Place a carbon steel wok or large heavy pan over maximum heat. Heat it empty for 2 full minutes until it just begins to smoke. Add the oil and swirl to coat; it should shimmer immediately on contact.
- Bloom the terasi: Add the terasi directly to the hot oil, crumbling it as you add it. Fry for 45 seconds, pressing it against the wok, until it darkens slightly and the oil smells fragrant and savoury rather than raw and pungent. This step is not skippable.
- Fry the bumbu: Add the bumbu paste and fry over high heat for 2-3 minutes, stirring constantly, until the paste darkens, loses its raw smell, and the oil begins to separate slightly around the edges. It should look drier and more concentrated than when it went in.
- Add the protein: Add the chicken, prawns, or tofu and stir-fry over high heat for 2-3 minutes until just cooked through. Don’t overcook, it will continue cooking once the rice goes in.
- Press and char the rice: Add the separated cold rice and spread it across the whole wok surface with the back of a spatula. Press firmly and leave for 20-30 seconds without stirring, then scrape and flip. Press again for 15-20 seconds and repeat 3-4 times, until the base develops colour and a slightly smoky smell. Add the spring onions halfway through this stage.
- Add kecap manis and soy sauce: Pour the kecap manis and soy sauce over the rice and toss quickly to coat every grain. Fry for 30-60 seconds more until the kecap manis caramelises and the rice turns deep brown and glossy. Taste and add more kecap manis or salt as needed. Remove from heat and stir in the sesame oil.
- Fry the eggs and serve: In a separate small pan, fry 2 eggs in a little oil until the whites are set and edges slightly crispy but the yolk is still runny. Plate the rice, top each portion with a fried egg, and add crispy shallots, sliced cucumber, and tomato. Serve immediately with sambal, lime wedges, and prawn crackers alongside.
For a milder dish, use large red chillies instead of bird’s eye and reduce to 1 chilli. The bumbu paste can be made a day ahead and refrigerated to speed up weeknight cooking.
Leave a Reply
You must be logged in to post a comment.